CLAM 4000 – Excluding Totalizer
Operational and Field Instructions
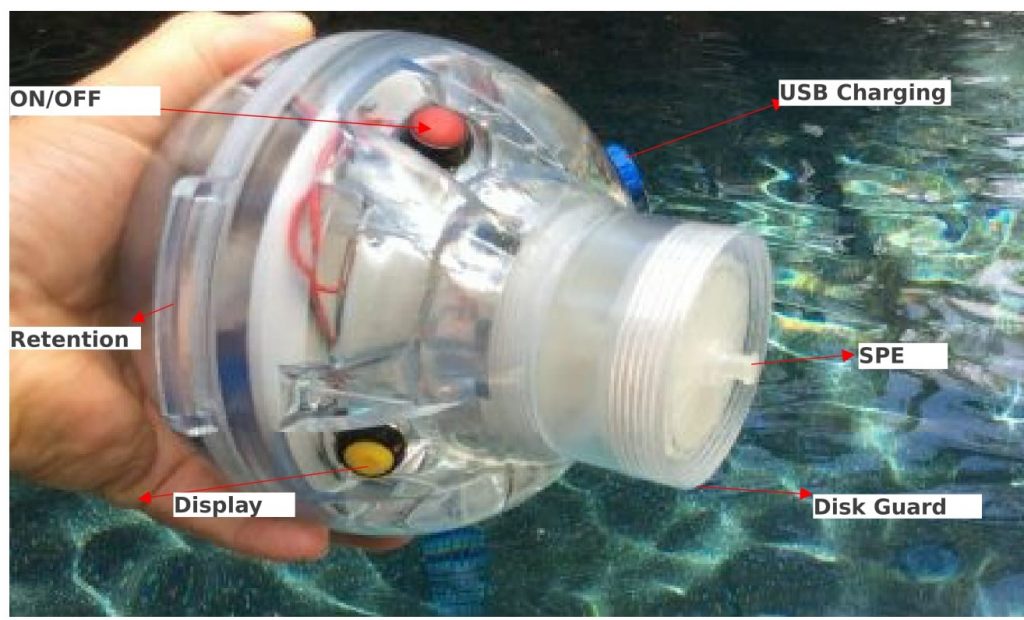
Above is a photo of the Continuous Low-level Aquatic Monitoring device called the CLAM. The CLAM comes in a field ready case with accessories shown in the photos above. The CLAM should be treated as an instrument and not subjected to severe jolts or rough handling.
The following steps will be a simple guide to turn on, deploy, estimate or measure the volume of water extracted and retrieve the CLAM and transport the SPE disks to the Laboratory.
Operational Steps
- Plug in the charger for the rechargeable battery that powers the CLAM. The charger uses USB to attach to the port in the CLAM. The battery should be plugged in for 12 hours to ensure a full charge before taking the CLAM to the field.
- Transport the CLAM with a fully charged battery in the CLAM case. Evaluate the location for the CLAM deployment. The CLAM is deployed floating, submerged, or floating with the CLAM Disk submerged and attached by tubing to the CLAM Pump Body at the surface. Many different deployment methods are possible, such as wading into shallow water and attaching to a fixed structure, or lowering into the water on a stainless steel chain or nylon cord, or placed by divers, or others. The CLAM is slightly buoyant and will naturally face the CLAM Disk down in the water which will reduce the potential for floatables to enter the CLAM Disk. The CLAM has slots that can be used with a cord, cable or tie-wraps to secure the body of the CLAM to a rope, chain, rebar, fencepost, buoy or structure. The CLAM can collect a sample about 2” below the surface of the water in the floating position, or samples can be collected at depth by submerging the CLAM or just the CLAM Disk. Keep security in mind when deploying the CLAM.
- Once the CLAM is removed from the case and is ready for deployment, Press the start button to ensure the pump is running. This is done in the air and not in the water. The pump will not be hurt by running in air, but should never be run in the water without a mounted extraction disk as large particulates can harm the pump. Press the start button again to stop the pump.
- A new CLAM disk will come in a Mylar mailer with luer lock plugs to keep the SPE media isolated and clean. Typically, the lab that will run the analysis will solvent clean and condition the Disks beforehand, providing an activated sealed disk and return mailer to the field for deployment. A “Sharpie” pen can be used to put a unique identification on each CLAM Disk to correlate with the Chain of Custody.
- Before removing the luer lock plugs from the CLAM Disk or Disks if being used in a 2 or 3 stage deployment (a pre-filter disk can be used in front of a media disk for total and dissolved studies), ensure that the CLAM is just about ready to be put in the water.
- Now remove the luer lock plugs from the CLAM Disk(s) and secure to the CLAM. The luer locks will only go one direction so if the disk fits securely, it is oriented correctly. The factory printed information on the Disk(s) will face out.
- This CLAM uses the following methods to determine the volume of water extracted through the CLAM Disk. A very accurate water volume can be obtained by collecting the water from the barbed discharge port. A tube can be run to a large container on shore or a bag in the water. After the deployment period the water is measured by volume or weight.
- This unit can also obtain a calibrated volume analysis +/- 20% for screening purposes in remote areas, or rugged conditions.


Empirical Collection

The water from the discharge port which is fitted with a tube barb connector, is fitted to a length of tubing which directs the discharged water to be collected into a container on shore. The CLAM can still be submerged or floated but is tube tethered to a shore based container. After deployment the total volume of extracted water is determined. The CLAM Disk(s) should now be placed in the Mylar mailer with the Chain of Custody form and delivered to the laboratory. The Chain of Custody should include the total volume of water extracted during the CLAM deployment. Although testing has shown that there is no degradation of the Disk(s) at room temperature, the deployed disks should be shipped like any environmental sample for trace organic analysis in a chilled state, as commercial laboratories will record the sample as a nonconformance if received otherwise.
Calibration Method
The calibration can be done either by placing the CLAM in the water you will be monitoring or in a bucket of the same water. In either event you need to be at your water source to calibrate. The key is to get 2-3 calibration measurements pre-deployment and 2-3 calibrations post deployment. These two measurements will aide you in determining the volume of water that has been extracted.
- Attach the tubing to the barbed discharge port on the exterior of the Sphere (See Photo). Connect the female Luer end to the male Luer syringe end and lock into place by twisting ¼ turn clockwise.
- Immediately float the CLAM in the water (or bucket of water). The disk will be facing down. Let the system run for a few minutes to stabilize flow, and to remove entrapped air.
- Hold the syringe next to the CLAM in a vertical position. Empty the Syringe Body of all water. Quickly turn and hold upright and immediately begin timing for 30 seconds and take the volume reading from the calibrated syringe body. Longer timed intervals can be performed using a larger volumetric container, to get an accurate flow rate in ml/ minute for the initial and final values.
- REPETE THIS PROCESS AT LEAST (2) more times to confirm an accurate calibration number. The point is to get 3 vol/min readings and average them and record the flow, and the date and time.
- While still activated remove the syringe and tubing from the discharge port, and secure the CLAM to a structure, branch, pipe, or board that will hold the CLAM with the disk housing completely submerged or floating. This model will run unattended, so let it extract, and retrieve it in less than 36 hours.
- Peform an ending calibration and possibly intermediate calibrations to obtain an average flow rate over the deployment time. Using military time will make the calculations of total volume easier.
- Unscrew the SPE CLAM Disk cap and twist off the SPE CLAM Disk from the luer-lock connector. Pour out any water in the CLAM Disk and place the (2) cap/plugs on either end. Place the CLAM Disk in the package provided, and submit to the laboratory.
- The amount of actual extraction time will also be based upon the TSS in the water. More TSS will plug the extraction disk more quickly and yield less water extracted.
- The CLAM Disk(s) should now be placed in the Mylar mailer with the Chain of Custody form and delivered to the laboratory. The Chain of Custody should include the total volume of water extracted during the CLAM deployment. Although testing has shown that there is no degradation of the Disk(s) at room temperature, the deployed disks should be shipped like any environmental sample for trace organic analysis in a chilled state, as commercial laboratories will record the sample as a nonconformance if received otherwise.
